How to Install a Shower Head: Complete Installation Guide
Does your shower head need to be replaced? Or are you upgrading your bathroom? [This article provides a complete guide to installing shower heads, allowing you to easily complete DIY and enjoy a comfortable shower experience.]
Last Updated: August 2025 | Estimated Reading Time: 15 Minutes

This Article Will Answer:
- What types of shower heads are there?
- What tools are needed to install a shower head?
- How to install a shower head step by step?
- What are the precautions during installation?
- How to check and troubleshoot after installation?
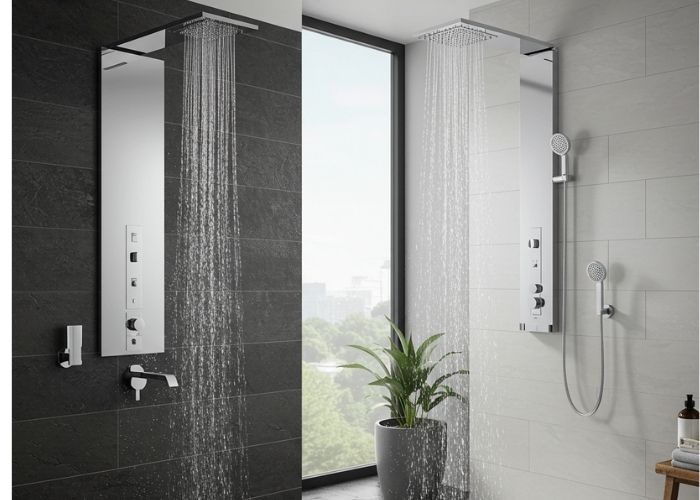
Types of Shower Heads
Understanding the different types of shower heads will help you choose the right installation method.
- Shower Column Shower Head [14]
- Traditional fixed shower head
- Usually adjustable in height and angle
- Concealed/Ceiling Shower Head 3
- Installed on the ceiling
- Modern minimalist design
- Hand Shower 2
- Connected with flexible hose
- Convenient and flexible to use
Tools Needed to Install a Shower Head
Before starting the installation, make sure you have the following tools ready:
- Adjustable wrench or pipe wrench
- Teflon tape
- Screwdriver
- Level gauge
- Marker pen
- Rolling ruler
- Small handheld cutting machine
- Towel (for surface protection)
- Possible replacement washers
General Installation Steps
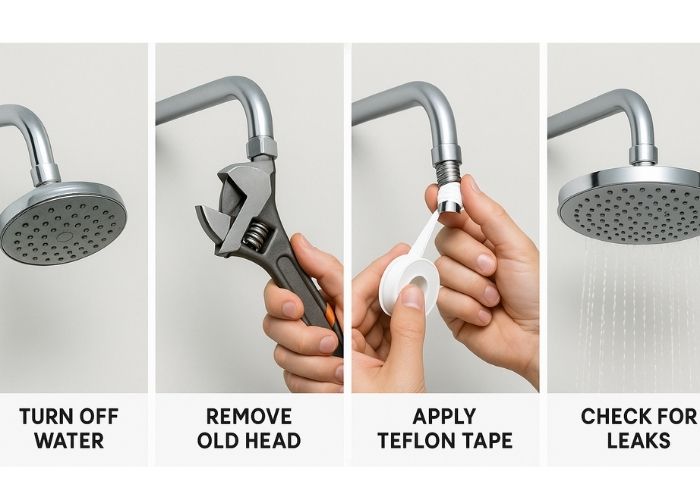
The following are the general steps for installing a shower head, applicable to most types of shower heads.
-
Turn Off Water Supply
- Locate and shut off main water valve
-
Remove Old Shower Head
- Loosen counterclockwise with wrench
- Clean residual materials from connection
-
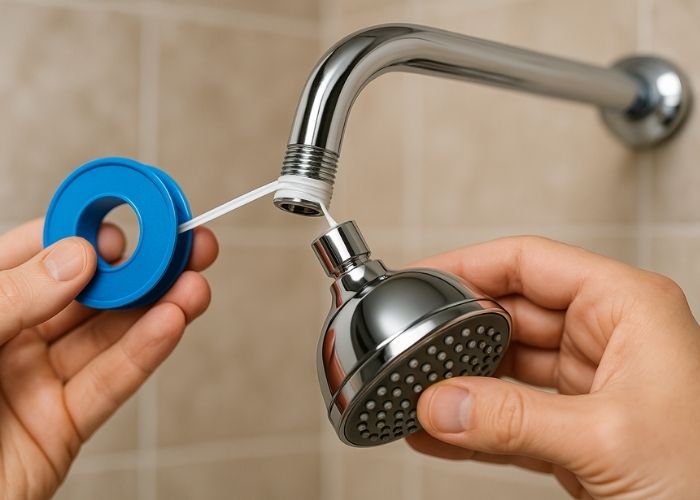
Apply Teflon Tape
- Wrap 15-20 clockwise turns on new head's threads
- Cover all threads completely
-
Install New Shower Head
- Hand-tighten first
- Then secure with wrench (1/4 turn)
- Avoid over-tightening
Special Installation Notes
Different types of shower heads have their special installation notes.
- Shower Column Head [14]
- Adjust mounting pole height properly
- Ensure all connections are sealed well
- Concealed Head 3
- Requires pre-installed plumbing
- Professional installation recommended
- Consider ceiling weight capacity
- Hand Shower 2
- Install mounting bracket securely
- Check hose washers when connecting
- Check sliding mechanism smoothness
Post-Installation Check
After installation, be sure to perform the following checks:
- Turn water on slowly
- Inspect all connections for leaks
- Test all functions
- Adjust to desired angle
Troubleshooting
If you encounter problems during installation or use, please refer to the following troubleshooting suggestions:
- Leaks: Reapply Teflon tape
- Low pressure: Check for pipe blockage
- Misalignment: Adjust mounting nut
Installation Steps for Exposed Shower Column
- Mark the installation position: Determine the installation height of the shower, the big shower head is generally installed about 2.3 meters from the ground, and also depends on whether the rod of the shower column can be raised and lowered.
- Horizontal measurement: Measure with a level to mark the fixing point of the shower column.
- Install hot and cold faucets: First clean the hot and cold water pipes, wrap the raw material tape around the hot and cold water S-connection, tighten the S-connection, adjust the horizontal position, and install the decorative cover and faucet.
- Fix shower column: Make sure connect well with bathtub/shower faucet, and fix on the wall.
- Connect the shower head and hose: Note that the tapered end of the hose is installed with a hand shower head, and the gasket needs to be put in; similarly, the big shower head (8" or 10") also needs to put in the gasket.
- Connect the shower head and hose: Pay attention to the sealing of the hose connection, you can wrap the raw material tape appropriately.
Installation Steps for Concealed Shower Head
-
Pre-embedded water pipes (newly renovated):
- For newly renovated bathrooms, you need to communicate with the construction master in advance, and use a pencil or ink line to outline the slotting route to pre-embed the water pipes.
- For old bathrooms, mark the size and do the tiling work.
-
Slotting operation:
- Use professional slotting tools to slot along the marked line.
- The slotting depth of the pre-embedded box of the rough wall is usually 5~6cm. The products of different brands and models will be different. Be sure to refer to the pre-embedded box logo, product manual or consult the manufacturer's customer service. Concealed shower heads have strict requirements for pre-embedding depth. The depth of different products is different, for example, the pre-embedding depth of the 2.0 interface is about 2.5cm, and the 2.5 interface is about 3.5cm.
-
Pre-embedding of connecting water pipes:
- Purchase suitable accessories: According to the specific size of the water pipes in your home, purchase matching PPR external wire through adapters.
- The common PPR water pipe specifications are 20mm and 25mm. When purchasing, accurately measure the pipe diameter of your water pipe to avoid installation failure due to mismatched accessory sizes.
-
Faucet installation/fixed pre-embedded parts:
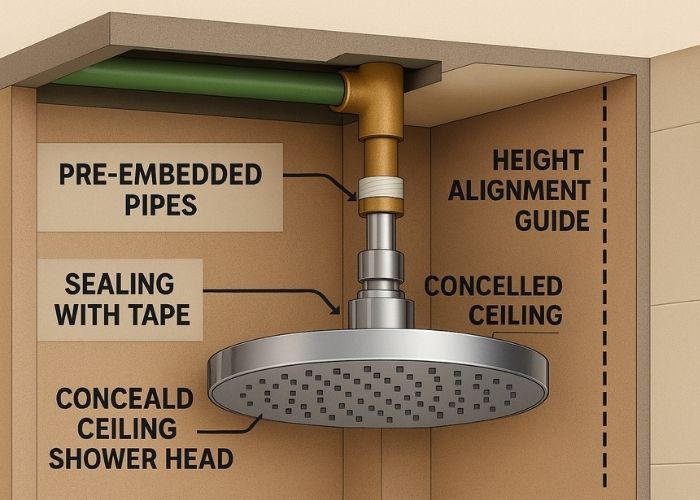
- When installing pre-embedded parts, you need to follow the principle of "one flat and one straight". "One flat" means that the horizontal plane of the pre-embedded part should be parallel to the ground, and the left and right inclination should not exceed 2°; "One straight" means that the front of the pre-embedded part should be perpendicular to the ground, and the front and rear inclination should not exceed 3°.
- After precise positioning with the help of a level and plumb line, use screws or expansion bolts to firmly fix the pre-embedded parts on the wall.
- The distance from the faucet to the ground (tile finished surface) is about 1.1 meters, and the distance from the hand shower to the ground is about 1.5 meters (horizontal water outlet arm or ceiling vertical water outlet arm), and the distance from the top spray big shower head to the ground is about 2.2 meters. These heights are not set in stone, and can be adjusted appropriately according to the height and usage habits of family members.
- Wrap 15~20 turns of raw material tape evenly around the threads of the connecting water pipe to enhance the sealing effect.
- (Optional) Reserve maintenance space: If conditions permit, a maintenance opening can be reserved on the back of the concealed shower head to facilitate future maintenance.
-
Water pressure test
- After completing the water connection, carefully remove the valve body protective shell, temporarily install the switch handle, and slowly open the water source for water test. During this process, carefully observe whether the water flow is smooth and whether there is any leakage at each connection. If the water flow is small or blocked, it may be that there are foreign objects in the pipeline, which need to be cleaned in time; if the connection leaks, you need to re-check the connection part, reinforce or reinstall.
- After the water test is normal, use a professional plug to block the water outlet and perform a sealing pressure test. Generally, the test water pressure needs to reach 1~1.5Mpa and last for 30 minutes. During this period, if the pressure drop does not exceed 0.05Mpa and there is no leakage at each connection, the test can be judged as qualified. If the pressure drops too quickly or there is a leakage problem, you need to comprehensively check the leak point, repair it, and re-conduct the pressure test.
- Put the protective shell back on. After the test, remove the temporary switch handle, put it back in the original packaging, and reinstall the protective shell. The protective shell can effectively block cement and waterproof paint from entering the valve body during subsequent tile sticking, avoiding blockage or damage.
-
Install the shower body: After the tile is completely dry and solidified, install the shower body. First install the water outlet arm to the pre-embedded pipe fittings, then install the decorative cover, and then install the big shower head. Don't forget the gasket and raw material tape for waterproofing during the process;
-
Leak detection
- The key link of acceptance is leak detection. Open all the water outlet functions of the shower, keep the water flow stable for 3~5 minutes, and carefully check all the connections, keep the water pipes and pre-embedded parts, the shower body and pipe fittings, the hand shower and the connecting hose, to ensure that there is no leakage. Focus on areas that are prone to water accumulation, such as corners and the ground. If there is leakage, you need to find the leak point and repair it in time.
Additional Precautions
- Be sure to close the main water valve before installation to ensure safety.
- Install according to the product manual. The installation methods of different brands and models of shower heads may be slightly different.
- Use raw material tape at the connection to ensure sealing and prevent leakage.
- Pay attention to protecting the tiles during the installation process to avoid scratching or damage.
- If you are not good at DIY, it is recommended to ask a professional to install it.
Practical Tips for Installing Different Shower Heads
| Shower Head Type |
Installation Tips |
Additional Precautions |
| Shower Column Shower Head |
Make sure the mounting rod is vertical and secure, use a level to measure. |
Check whether the lifting function of the shower column is smooth, and avoid jamming during use. |
| Concealed/Ceiling Shower Head |
When pre-embedding the water pipe, make sure the depth of the pre-embedding box meets the product requirements and reserve enough maintenance space. |
Before installation, be sure to confirm the load-bearing capacity of the ceiling to avoid safety hazards caused by overloading. |
| Hand Shower |
When installing the bracket, choose a suitable installation location to ensure convenient use. |
Check whether the gasket at the hose connection is intact to avoid leakage. |
Common Problems and Solutions for Shower Head Installation
| Problem |
Possible Cause |
Solution |
| Connection Leaks |
Insufficient raw material tape or no raw material tape, loose connections. |
Rewrap the raw material tape to ensure that all threads are covered, and tighten the connection with a wrench. |
| Low Water Pressure |
Pipe blockage, shower head internal blockage, insufficient water pressure. |
Clean the blockage inside the pipe and shower head, check whether the water pressure meets the requirements, and consider installing a booster pump. |
| Poor Water Flow |
Shower head outlet is blocked, internal structure is damaged. |
Clean the shower head outlet. If the blockage is serious, try to unblock it with a needle or toothpick. If the internal structure is damaged, it is recommended to replace the new shower head. |
Conclusion
Correctly installing a shower head is key to ensuring a comfortable shower experience. [By following the steps and precautions in this guide, you can easily complete DIY installation and enjoy a comfortable shower.]
Recommended Internal Links:
- Shower Head Introduction: https://www.faucetproducer.com/products/shower-head
Recommended External Links:
- Hansgrohe Official Website https://www.hansgrohe-usa.com/
- Delta Faucet Official Website https://www.deltafaucet.com
- Shower - Wikipedia https://en.wikipedia.org/wiki/Shower
- Faucet factory https://faucetproducer.com


